The Levitan Website
A personal website
CD Crafts 1
Coffee mats
This is the easiest thing to do. You can use unwanted CDs simply as coffee mats, silver side up, or picture side up, if you prefer. If you want to do something a bit more arty try this:
- Get some cork tiles (thin ones are best) and carefully cut a circle the same size as the CD using your CD as the template and a palette knife. Make sure you cut onto a wooden surface that is okay to get scored with the knife, and if you are a kid, please ask a grown up first.
- Put some glue onto the cork tile and carefully score the surface of the CD that you'll glue onto the tile so that the glue sticks well. Use PVA or similar glue.
- Carefully press the scored surface of the CD onto the cork tile and then leave it to dry.
-
 Once the glue has dried you can paint the surface of the CD. Use enamel paints as these dry as a hard, heat resistant surface. Lightly sandpaper the surface of the CD before painting it. The best technique is to lay down the enamel in layers. For example to make this smiley face picture (on the right) you paint the whole disk yellow. Once the yellow layer has dried, paint the red smiley face. The nose is made by painting inside the hole at the centre of the CD. Finally, to make the whole thing really hardy, give it a coat of clear, gloss polyurethane varnish. You can, of course, paint far more interesting pictures than this.
Top of page
Whirligig
A whirligig is traditionally a circular, brightly painted piece of wood with a central hole.

Through this hole runs a wooden "axle" which has small circular end stops at each end. A loop of string runs from one end stop to the other. You hang it up from a loop at the midpoint of the string and then wind up the whirligig until the central wooden wheel fits snugly inside the string. Then give it a gentle unwinding turn and release it: the wooden wheel unwinds and rewinds, up and down the string, and the painted design forms patterns as the wheel spins. In this case you simply substitute CDs for the wooden wheel.
- Glue at least three and preferably four or five CDs together to make the central "wheel". Make sure the outer CDs have their silver sides on the outside.
- When the glue is dry, paint designs on both sides of the "wheel". Spirals and circles make good spinning designs, but try out other ideas too. Use enamel paint as this sticks well to the surface of the CD. Permanent marker pens are also good.
- Take a piece of 14mm dowel and cut a 2cm piece.
-
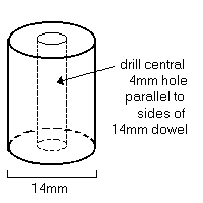 Drill the dowel with a central hole just wide enough for a 4mm dowel to fit inside. You may have to drill this by hand; if so try to make sure the hole is both central and straight through keeping parallel with the sides of the dowel. (You will probably need an adult to help with this).diagram of dowel.
 - Take a piece of 4mm dowel and cut a 12cm length.
- Once the CDs are completely dry, carefully put the 14mm dowel into the centre hole and apply a little glue.
- Put the 4mm dowel into the 14mm dowel so that it is exactly halfway through and glue it in place.
- Take a piece of 8mm or 10mm dowel and cut two 1.5cm lengths.
- Drill both of these so that they can fit snugly over the ends of the 4mm dowel.
- Take a piece of string and cut to about one metre. Nylon curtain string is good as it doesn't fray.
- Insert the string into one of the 8mm dowel pieces, apply some glue and then push over the end of the 4mm dowel. Do the same at the other end with the second 8mm dowel piece.
- Tie a loop in the string half-way along its length.
That's it. Hang up the whirigig, wind it up and watch it spin!
Top of page Next page >>
Other craft pages
Miscellaneous Crafts
- Snakes alive!
- Crawler
- Potato prints
- Drop the ball
- Puppet
- Hama Bead pictures
- Salt dough
- Crystallised flowers